As the world increasingly shifts towards sustainable energy solutions, solar power stands out as one of the most accessible and effective methods for reducing carbon footprints. Harnessing the sun’s energy not only helps in mitigating climate change but also offers substantial savings on electricity bills. This guide is designed to walk beginners through the process of solar panel installation, providing a clear understanding of each step involved.
Understanding Solar Panels
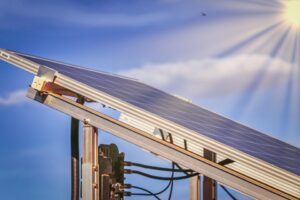
Before diving into the installation process, it is crucial to understand what solar panels are and how they work. Solar panels, also known as photovoltaic (PV) panels, convert sunlight into electricity. They are composed of numerous solar cells made primarily from silicon, a semiconductor material. When sunlight hits these cells, it knocks electrons loose, creating an electric current.
Types of Solar Panels
There are three main types of solar panels: monocrystalline, polycrystalline, and thin-film. Monocrystalline panels are known for their high efficiency and sleek appearance, while polycrystalline panels offer a more cost-effective solution with slightly lower efficiency. Thin-film panels, on the other hand, are lightweight and flexible, making them suitable for unique installations.
Planning Your Solar Panel Installation
Assessing Your Energy Needs
Determining your household’s energy consumption is the first step in planning a solar panel installation. Start by reviewing your electricity bills to understand your average monthly usage in kilowatt-hours (kWh). This will help you calculate the size and number of panels needed to meet your energy needs.
Site Evaluation
Conducting a site evaluation is crucial to ensure optimal performance of your solar panels. Check the orientation and tilt of your roof, as panels should ideally face south in the Northern Hemisphere for maximum sunlight exposure. Assess any potential obstructions like trees, buildings, or chimneys that could cast shadows on your panels, reducing their efficiency.
Checking Local Regulations
Before proceeding, familiarize yourself with local regulations and zoning laws regarding solar installations. Some areas may require permits or have specific guidelines that you must follow. Additionally, reach out to your homeowner’s association if applicable, as they may have their own rules concerning solar panel installations.
Choosing the Right Equipment
Solar Panels
Selecting the right solar panels is crucial for the success of your installation. Consider efficiency, durability, warranty, and cost. Research different manufacturers and read reviews to ensure you choose a reliable brand that offers good value for money.
Inverter Selection
An inverter is a key component of a solar power system, converting the DC electricity generated by your panels into AC electricity, which can be used by your home appliances. There are three main types of inverters: string inverters, microinverters, and power optimizers. Each has its pros and cons, so choose one that best suits your needs and budget.
Mounting Systems
Your solar panels need to be securely mounted to your roof or ground. Roof-mounted systems are more common, but ground-mounted systems can be a great alternative if your roof is unsuitable. Ensure the mounting system you choose is compatible with your roof type and is designed to withstand local weather conditions.
Installation Process
DIY vs. Hiring Professionals
While installing solar panels yourself can save money, it is a complex task that requires electrical knowledge and experience working at heights. If you are not confident in your abilities, it is advisable to hire licensed professionals to ensure a safe and efficient installation.
Installation Steps
- Set Up Scaffolding: Safety is paramount. Erect scaffolding to prevent falls during installation.
- Install Mounts: Attach the mounting system to your roof, ensuring it is securely fastened and positioned for optimal sun exposure.
- Place the Panels: Carefully place the solar panels onto the mounts and secure them in place.
- Wire the Panels: Connect the solar panels to the inverter using appropriate wiring, ensuring all connections are secure and weatherproof.
- Connect the Inverter: Install the inverter in a location that is easily accessible, and connect it to your home’s main electric panel.
- Ground the System: Properly ground your solar panel system to protect against electrical surges and ensure safety.
- Test the System: Once everything is connected, test your solar panel system to ensure it is functioning correctly and efficiently.
Connecting to the Grid
After installing your solar panels, you may need to connect them to the local power grid. This process varies depending on your location and utility company. Typically, you will need an inspection to ensure your system complies with safety standards, followed by the installation of a net meter that allows you to sell excess power back to the grid.
Maintenance and Troubleshooting
Regular Maintenance
Solar panels require minimal maintenance, but regular checks are necessary to ensure peak performance. Clean the panels periodically to remove dust and debris, and inspect for any signs of wear or damage.
Troubleshooting Common Issues
If your solar panel system is not performing as expected, check for common issues such as shading, dirty panels, or faulty wiring. If problems persist, consult a professional for a thorough inspection and repair.
Conclusion
Installing solar panels is a rewarding endeavor that offers both environmental and financial benefits. By following this guide, beginners can gain a comprehensive understanding of the installation process and make informed decisions for their solar power journey. Whether you choose to install the panels yourself or hire professionals, harnessing the power of the sun is a step towards a more sustainable future.
#ChatGPT assisted in the creation of this article.